Migrating to eWarehousing-Shopify v3 integration
This guide is intended for anyone who currently has a Shopify store with the eWarehousing Fulfillment App. Before following the steps in this guide, please read the Disclaimer and warnings carefully.
Step 1. Installing the app
Follow the guide to correctly install the Shopify integration.
Step 2. Disabling inventory synchronization
- Log in to the Shopify Admin.
- Go to Apps > eWarehousing.
- Scroll down to Inventory management and disable the option.
Attached is a screenshot of the management screen with Inventory management disabled.

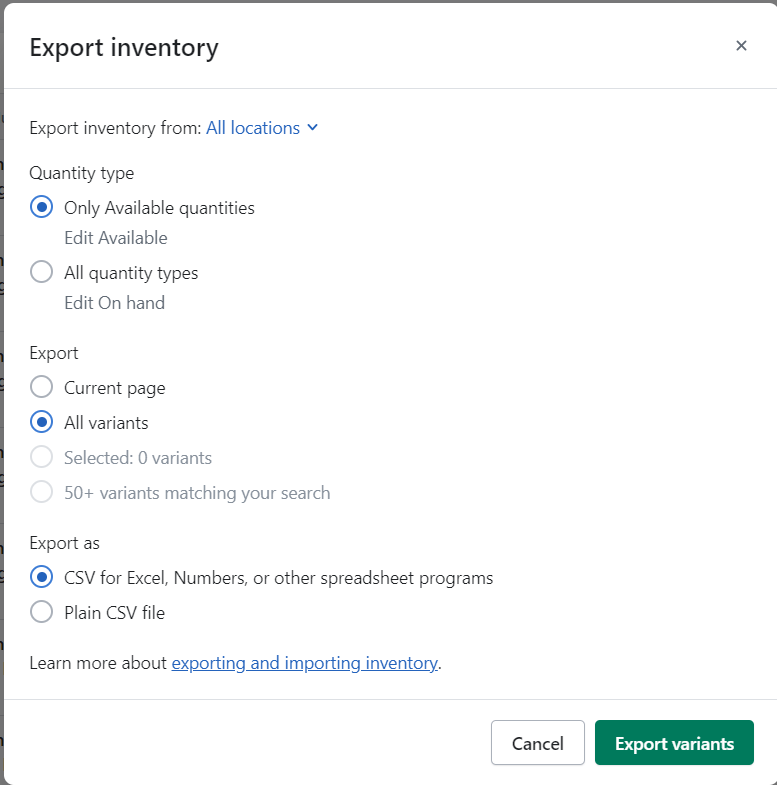
Step 3. Perform an inventory export
To quickly transfer all inventory from the old location to the new location, we need to perform an export that includes all inventory levels for both the new and old inventory.
- Go to the Shopify Admin.
- Navigate to Products > Inventory.
- Click on Export.
- Verify the settings and click Export variants.
Important: points to note: Under Export inventory from, select All locations. Choose Only available quantities. It can also be All quantity types, but this guide will not provide instructions on how to transfer inventory using this option. Export all variants (unless you have made a specific selection to test it). If you prefer to work with Excel or another program, select CSV for Excel...
The exported inventory will be sent to the email address associated with your Shopify account.
Step 4. Transferring inventory
The easiest way to transfer inventory is to simply swap the two columns of inventory. In the export, there will be two fields, one called eWarehousing and another with a default name like eWarehousing Fulfillment.
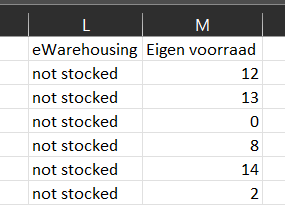
If we want to transfer the inventory to eWarehousing, we just need to switch them!
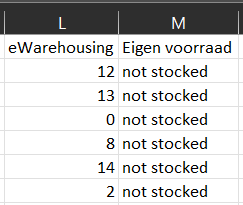
Pro-tip, just switching the headers is much quicker than switching the values
Afterward, save the file as a CSV.
Step 5. Importing inventory
- Go to the Shopify Admin.
- Navigate to Products > Inventory.
- Click on Import.
- Drag your CSV file to the upload area and press Upload.
Shopify will provide a notification about the number of products that will be modified. You will receive an email after the upload indicating whether it was successful.

Step 6. Deleting the old app
- Go to the Shopify Admin
- Navigate to Settings > Apps and sales channels
- Click on Develop apps (top right corner)
- Click on the eWarehousing Fulfillment App
- Uninstall the old integration
Step 7. Enabling inventory synchronization (optional)
If you want to use inventory synchronization again, we need to enable it within the app.
- Log in to the Shopify Admin.
- Go to Apps > eWarehousing.
- Scroll down to Inventory management and enable the option.
Disclaimer and warnings
Products with open orders will generate error messages and need to be manually transferred (this can be avoided using the All quantities export, but it is not covered in this guide).
Products with transfers will generate error messages and need to be manually transferred. It is your responsibility to test the Export and Import with smaller quantities before transferring the entire inventory.
This solution will transfer many products, but always be prepared for the worst. Keep a backup of the old export with the correct inventory levels. This way, you can ensure that nothing can go wrong.